출처 : https://www.paluszek.com/wp/2019/04/15/overview-of-vmware-vcloud-availability-3-0-tenant-deployment-protection-workflow-resources/ (VCPP AMER SE Blog)
Once the provider site is operational, we are ready to bring the on-premises / Tenant site online for VMware vCloud Availability 3.0 (vCAv). Again, recap of the deployment steps:
- Deploy vCAv On-Premises Appliance
- Start configuration wizard
- Connect to vCAv Cloud Tunnel
- Configuration of local placement
- Validation and vSphere UI
Before we get started, let’s take a look at a port mapping diagram.
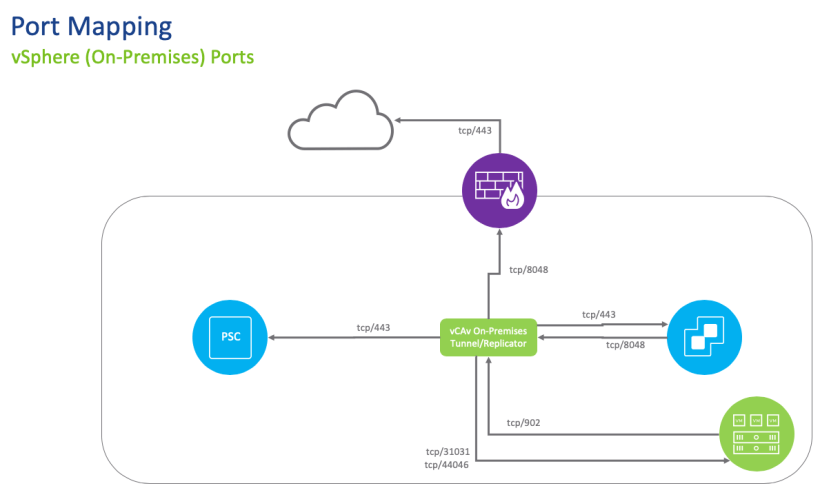
What’s interesting is one does not need a DNAT rule for tunnel traffic. The reason is any traffic is initiated from the on-prem site negating any ingress traffic (everything flows outbound), hence a standard SNAT (route) is sufficient. This is great as we do not need any network changes on the client side.
Deploy vCAv On-Premises Appliance
Deploying the appliance is very similar to the provider side. We have packaged up a standalone on-premises appliance that does not have the selection of the roles (and minimizes any client confusion). In the on-premises version, one does not have a dropdown of the service role selection, but just a acceptance and typical OVF deployment –

So again, very easy and similar to typical VMware OVF deployments.
Start Configuration Wizard
Let’s open a browser to https://onprem-fqdn/ui/admin and login –

You will be prompted to change the password to the appliance. From there, let’s hit the initial setup wizard –

Set your site name and any pertinent description. Click Next when complete.
As expected, we need to establish the lookup service along with SSO credentials.

On Cloud Details, this is where we pair with our vCloud/vCAv site. Configure the public API endpoint (for my lab, I am using 8048 but I showed earlier on utilizing 443) along with your organization administrative credentials.

Toggle the “Allow Access from Cloud” option if you want users from vCD to have the ability to browse and configure VMs locally from this site.
Accept (or remove) the CEIP and let’s take a look at the final completion screen –

Before hitting Finish, let’s toggle the “Configure local placement now” option to knock this out.
Local placement sets the vCenter/resource hierarchy for cloud to on-premises / failback protection.
Next, we will see a 5 step process for Local Placement – walk through the UI and select the hierarchy objects.

Validate and hit the Finish button.

Validation and vCenter UI
From our Cloud site, we can now see a new On-Prem Site and shows a status of OK.

Re-logging into the on-premises appliance, we can see the Manager and Cloud status as healthy also –

From the vSphere Client, we can also see vCloud Availability available –

Protection Workflow
We have two operations available: Protection and Migration. In the two below screenshots, our options change based on what button is selected.


One can establish incoming or outgoing replications between cloud or on-prem –

While I am not going to exhaustively go through every permutation, one can see how intuitive it is to protect or migrate workloads.
Protection from On-Premises

In my source site, I only have one choice as I select from On-Prem and have a single paired vCenter/Tenant site.
From here, I select the VMs I want to protect.

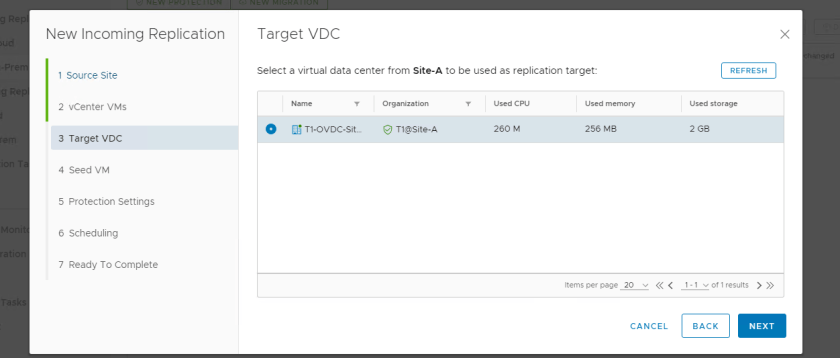
Select the Target oVDC –
If there’s a Seed VM available, select it.

Now I can specify my protection settings: my RPO, storage policy, retention policy for point in time instances, and if I want to quiesce/compress the instance and traffic.

Scheduling can be defined –

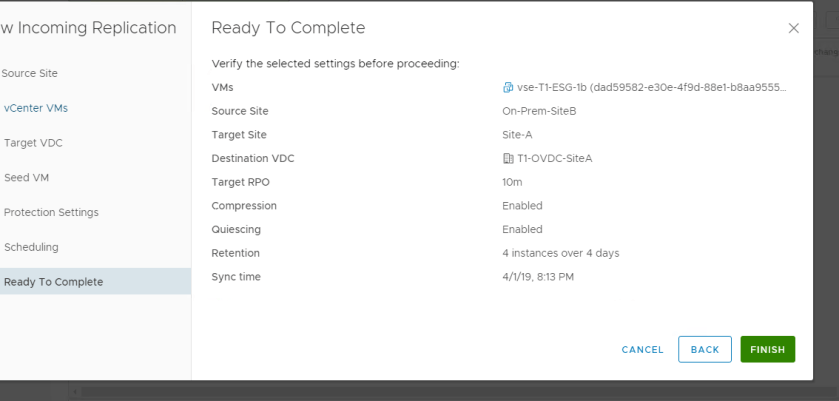
Finally, we get to see our validation.
Protection Settings – Viewing, Re-Addressing
Reviewing the current state, one can ascertain the health of the current protected workload with my source, destination, and RPO –

Clicking on the Networks button brings up our menu on what we want to do on Migrate/Failover or Test Failover –

This can be applied to all associated vApps or VMs, or explicitly broken down on per vNIC basis. One can also reset the MAC. Note that all of the same vCD guidelines apply – can’t set a manual IP outside of the CIDR block of that oVDC network, etc.
Clicking the sub-button Test Failover presents similar options, but one can copy from the Migrate/Failover menu to get started.

If we need to change the Replication Owner, we can click the Owner and select the new organization owner.

Migrate/Failover/Test Failover
Going through the Migrate, Failover, and Test Failover options are very intuitive.
For Migrate, we can select to power on the recovered vApps and apply the specific preconfigured network settings (or override that and select a specific network) –

For Failover, very similar to migrate, but we can drill into a Recovery Instance –


Lastly, Test Failover provides the ability to test a VM/workload without impacting production. This can be associated to a “bubble/fenced” network and tested by the application team to verify functionality.

Resources
As a final thought, I want to say how it’s been a pleasure working with the team to see this to fruition and public release. I believe this is going to be an extremely powerful platform and this is just the start.
After vCAv 3.0 is released, I will have more material along with many of my peers who will be discussing vCAv further. Below are some lightboard videos that introduces some of the concepts through these posts. Enjoy!
'Job > vCloud Director' 카테고리의 다른 글
| vcd lb 구성방법 (1) | 2021.10.20 |
|---|---|
| vCloud Director JMS 인증서 만료 Issue 로 인한 VM Power On-Off 느림 현상 조치 정리 (0) | 2020.09.25 |
| vCloud Director Edge Gateway 분리 방법 (0) | 2020.09.24 |
| vCloud Director 에서 vDisk 별 Maximum Size 설정 방법 (0) | 2020.09.24 |